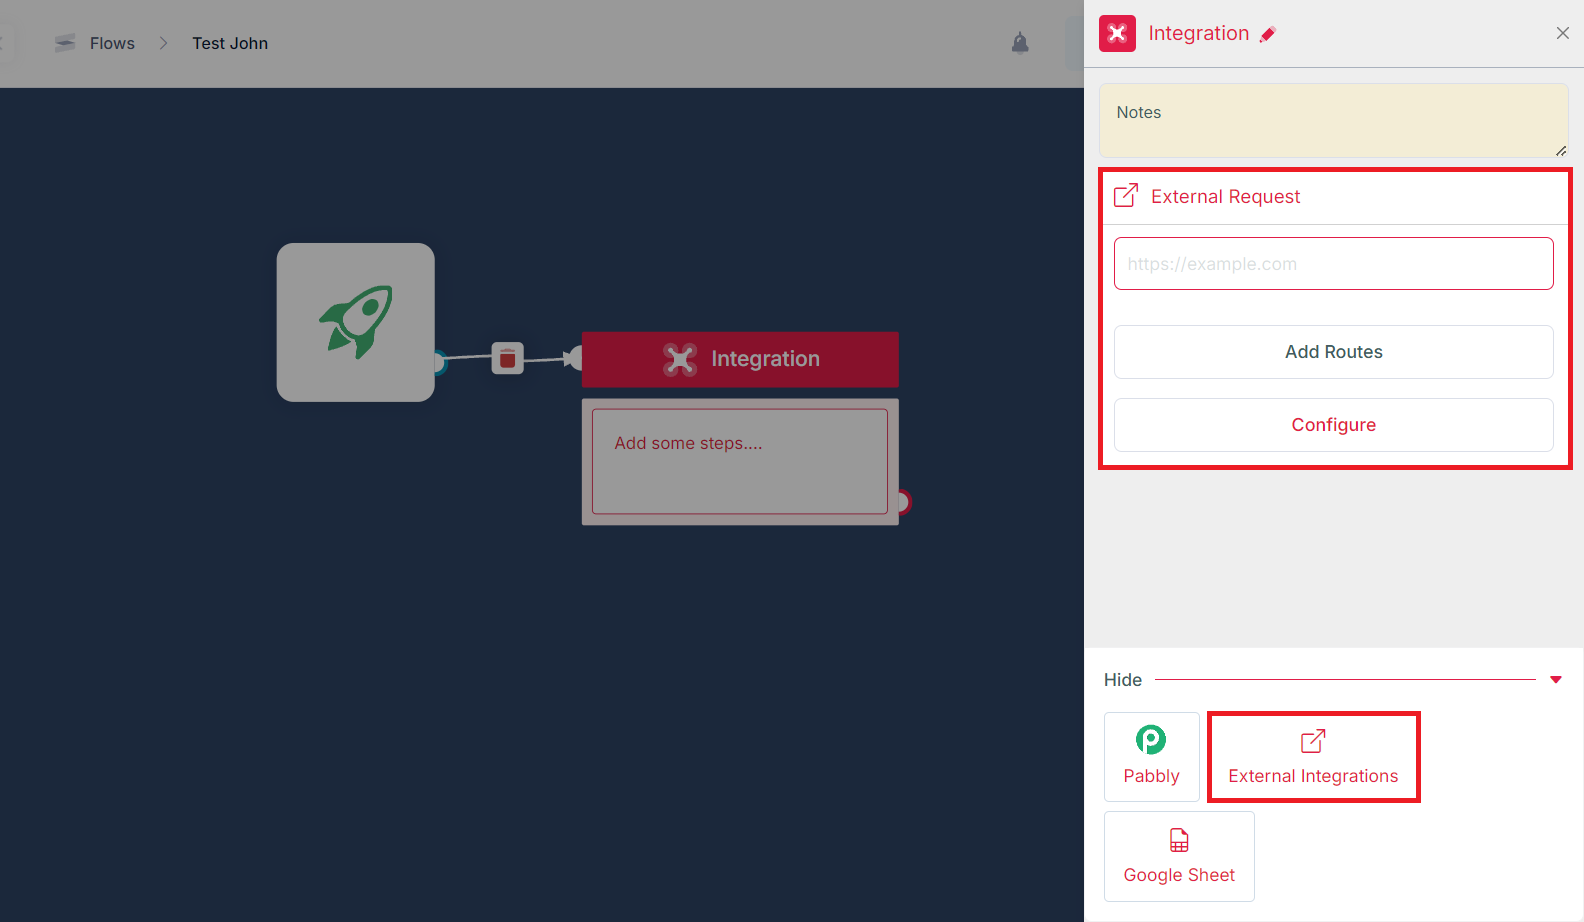
Integration
You can integrate our platform with a third party.
After “Double Click” on it, there are various features in this Block:
Pabbly Integration
-
We can send a custom trigger of pabbly trigger event with custom data from here. More information will be seen in the integration section. It contains:
-
Name: It's just a user reference name.
-
Webhook URL: The webhook URL will be received from pabbly portal when you select the custom trigger section from the pabbly portal.
-
Data: The data is used to send custom payload inside pabbly trigger and data will be in JSON format.
External Integration
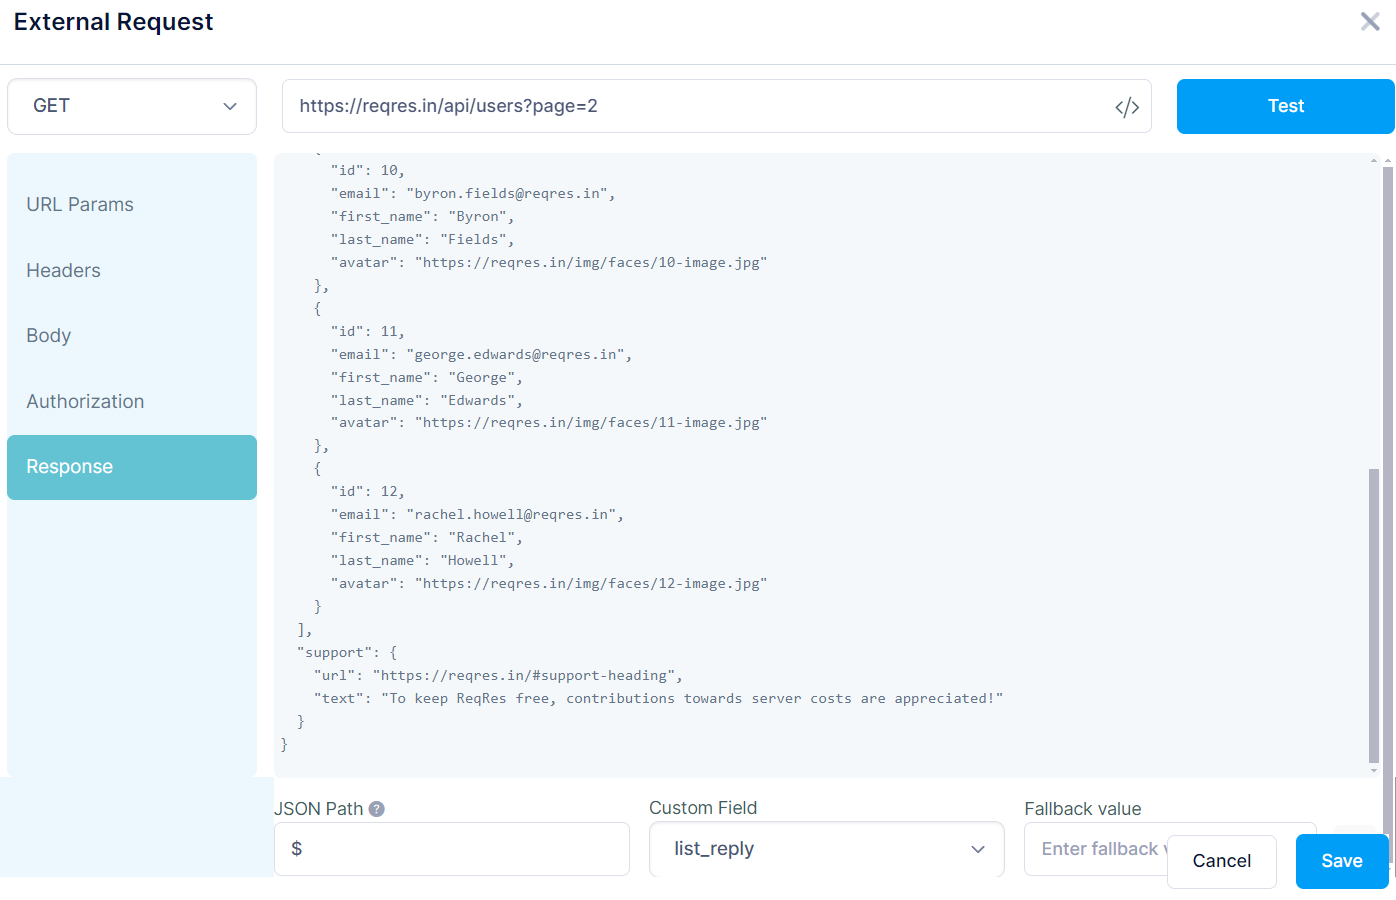
- With external requests, you can call APIs from other third parties or your server to request data, submit data, etc. You can see this in the image below.
Click on Configuration

1. choose a request type such as GET, POST, etc
2. paste your request URL / endpoint
3. adjust URL parameters, Headers, Body or Authorization section if needed. e.g. setup API key
4. click Test and area 5 will show in the Response section with a response code
5. Response: You can Map the response that is received from API by using JSON Path.
Google Sheet Integration
- With Google Spreadsheet, you can add, update, and look up your data in a spreadsheet as well as process the data with various built-in tools with Google.
- Click on Google sheet integration. Click on Configure button, you will see features like this
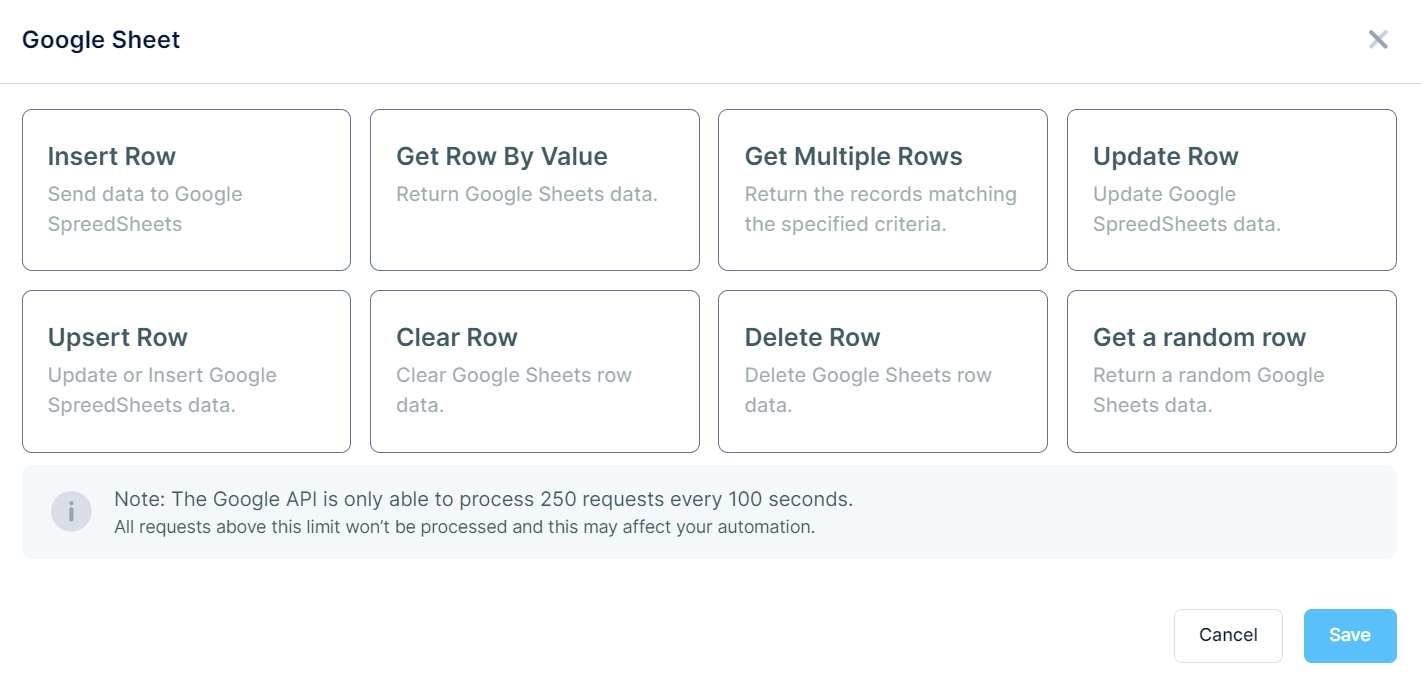
Here are the steps you'll follow
Insert Row
Step 1: Select the Feature
- Select to the Insert Row option within the chatbot Portal where different Google Sheets operations are displayed.
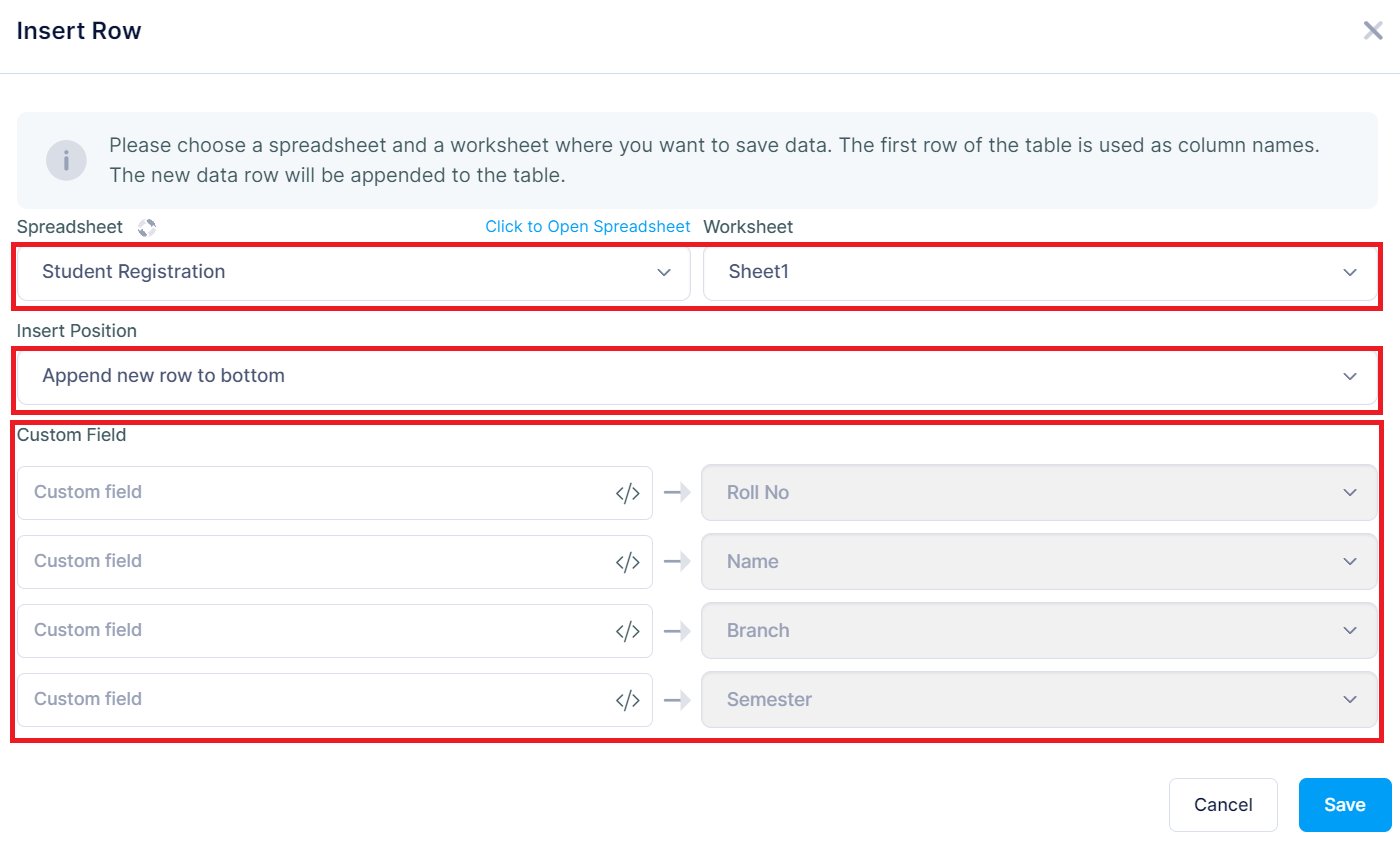
Step 2: Configure the Destination
- Spreadsheet Selection: Choose the Google Sheets file where you want the data to be inserted. This is typically done by selecting from a list of available spreadsheets connected to your Google account.
- Worksheet Selection: Select the specific worksheet within the chosen spreadsheet where the new data row will be added.
Step 3: Specify the Data
- Insert Position: Choose where in the sheet the new row should be inserted. The default option is to append the new row at the bottom of the specified worksheet.
- Custom Fields: Input the data for each column in the new row. You need to ensure that the data fields align with the columns in the Google Sheet.
Step 4: Save the Configuration
After setting all the necessary options, click the Save button to execute the insertion. The data will then be added to the Google Sheet in the specified location.
Get Row By Value Feature
Overview
The Get Row By Value feature enables users to retrieve specific rows from a Google Sheet based on matching criteria. This function is especially useful for querying data directly through the chatbot Portal, facilitating quick searches and data retrieval without manual filtering.
How to Use the Get Row By Value Feature
Step 1: Select the Feature
- Select to the Get Row By Value option within the chatbot Portal where Google Sheets operations are listed.
Step 2: Configure the Destination
- Spreadsheet Selection: Choose the Google Sheets file from which you want to retrieve data. Select from a list of available spreadsheets linked to your Google account.
- Worksheet Selection: Choose the specific worksheet within the selected spreadsheet to query data from.
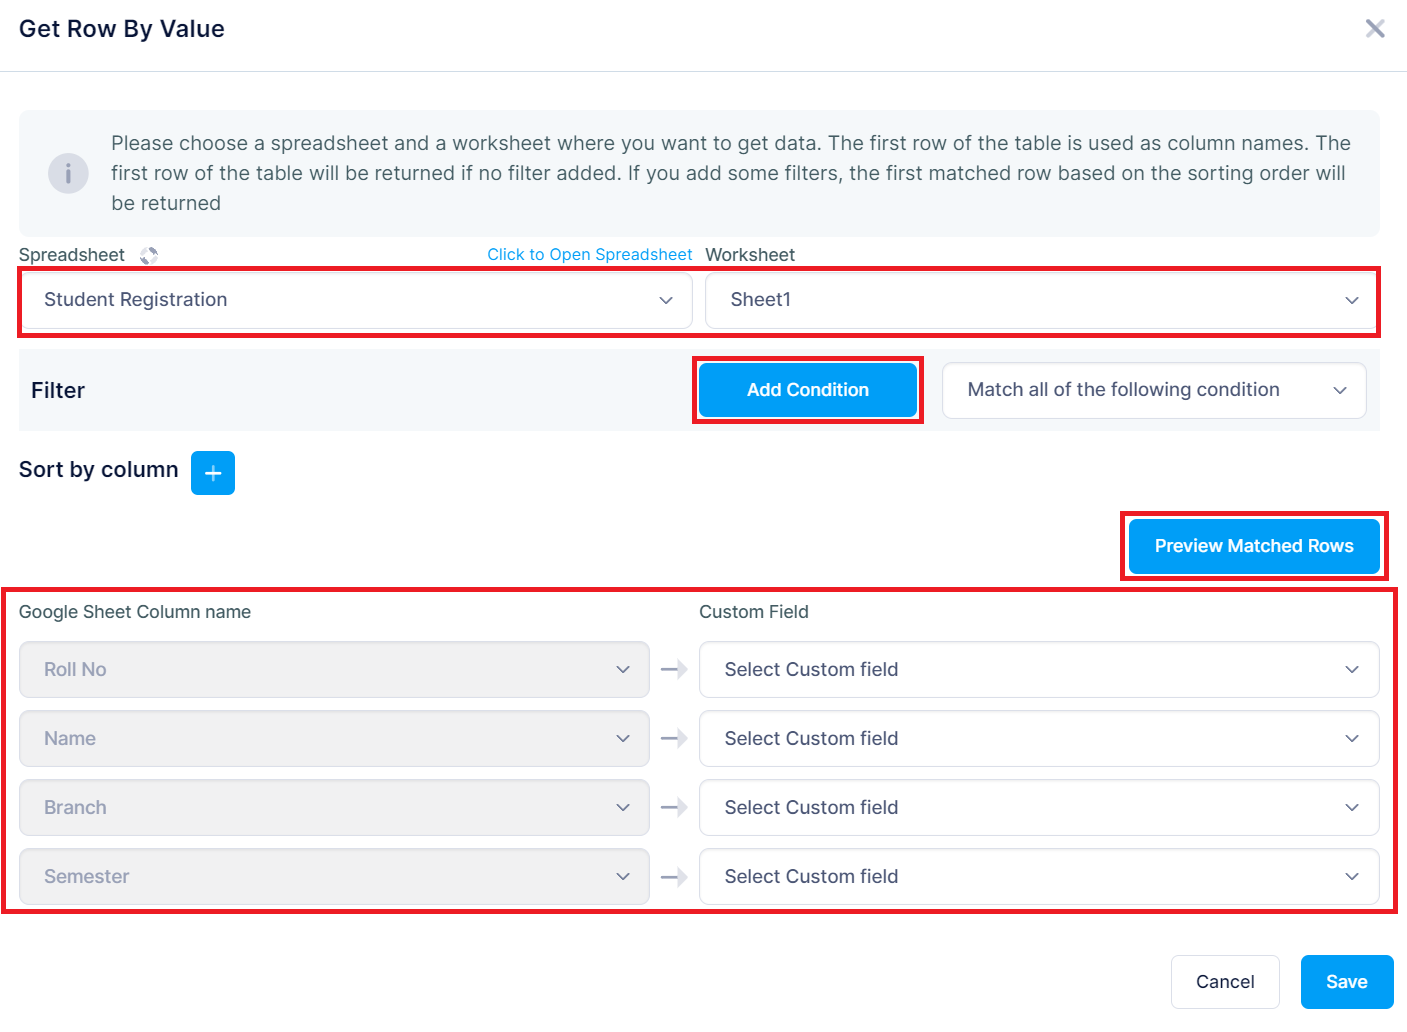
Step 3: Set Filter Conditions
- Filter: Define one or more conditions to filter the rows you want to retrieve. You can set these conditions based on data present in any column of the worksheet. For example, filtering by Roll No to find specific student records.
- Sort By Column: Optionally, you can sort the filtered results by a specific column. This helps in organizing the data retrieval process, especially useful when multiple rows match the filter criteria.
Step 4: Preview and Retrieve Data
- Preview Matched Rows: Before finalizing, preview the rows that match your filter criteria to verify the accuracy of the data being retrieved.
- Save: After confirming the filtered results, click Save to complete the data retrieval process. The matched rows will be displayed or processed according to your configuration.
Get Multiple Rows Feature
Overview
The Get Multiple Rows feature enables users to retrieve multiple rows of data from a Google Sheet based on specified filters and sorting criteria. This functionality is particularly useful for fetching bulk data directly through the chatbot interface, which can help in generating reports or performing data analysis.
How to Use the Get Multiple Rows Feature
Step 1: Select the Feature
Select to the Get Multiple Rows option in the chatbot's Portal, where you can access various Google Sheets operations.
Step 2: Configure the Destination
- Spreadsheet Selection: Select the Google Sheets file from which you want to retrieve data. Choose from a list of available spreadsheets that are connected to your Google account.
- Worksheet Selection: Choose the specific worksheet within the spreadsheet from which the data will be retrieved.
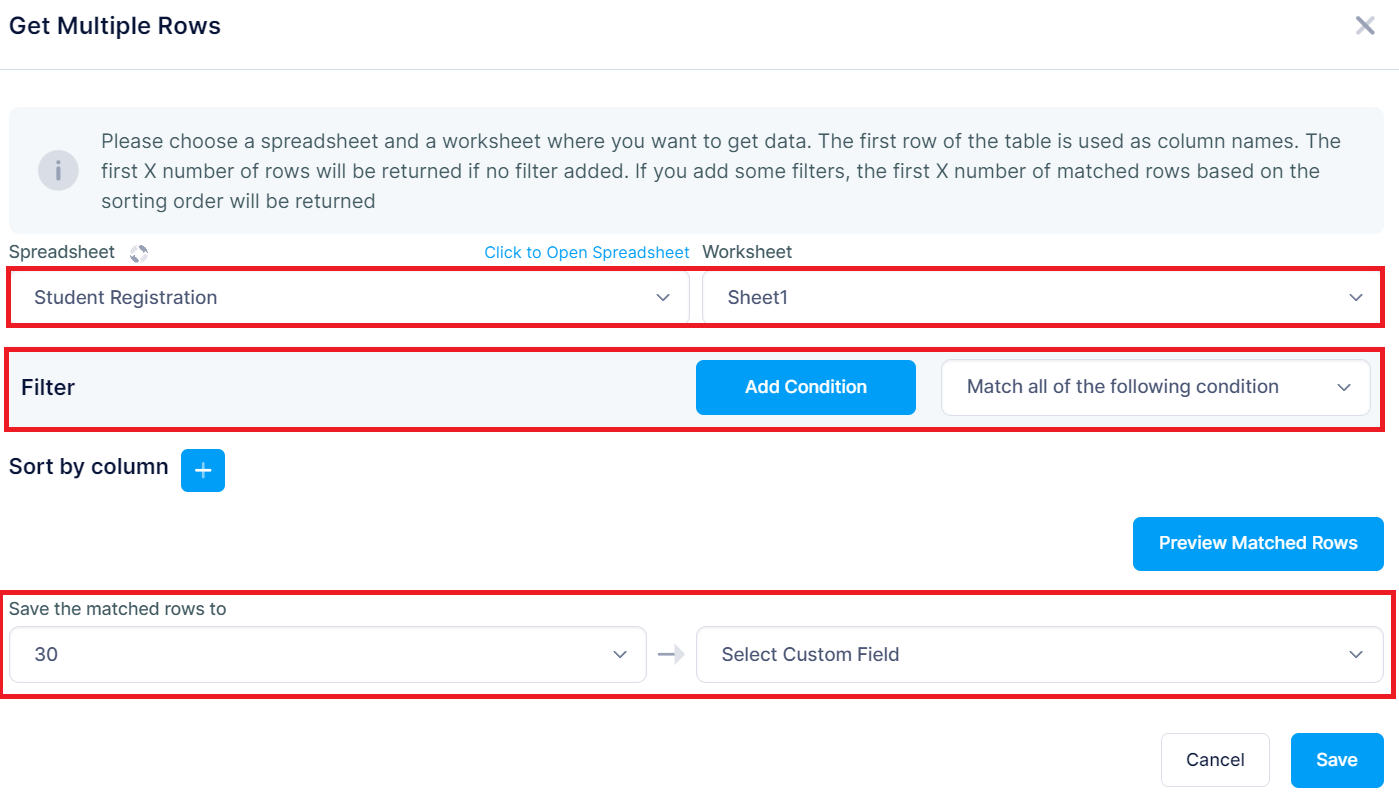
Step 3: Define Filters and Sorting
- Filter: Set one or more conditions to filter the data. These conditions can be based on the data present in any column of the worksheet, such as filtering by Branch or Semester.
- Sort By Column: Add sorting criteria to organize the retrieved data in a specific order. This can be based on any column, like sorting by Name or Roll No.
Step 4: Select Number of Rows to Retrieve
- Save the matched rows to: Specify how many rows to retrieve. This option allows you to limit the number of rows returned by the query, such as the first 30 matching rows.
Step 5: Preview and Retrieve Data
- Preview Matched Rows: Before finalizing, you have the option to preview the rows that match your filter and sorting criteria to ensure the accuracy of the data retrieval.
- Save: After confirming the data, click Save to complete the retrieval process. The specified number of matched rows will be displayed or processed according to your settings.
Update Row Feature
Overview
The Update Row feature allows users to modify existing rows in a Google Sheet directly from the chatbot interface. This feature is crucial for updating records without the need to manually search and edit the data in Google Sheets.
How to Use the Update Row Feature
Step 1: Select the Feature
- Open the Update Row option within the chatbot's Portal where various Google Sheets operations are available.
Step 2: Configure the Destination
- Spreadsheet Selection: Choose the Google Sheets file where you want to update data. Select from a list of available spreadsheets that are linked to your Google account.
- Worksheet Selection: Pick the specific worksheet within the chosen spreadsheet where the data needs updating.
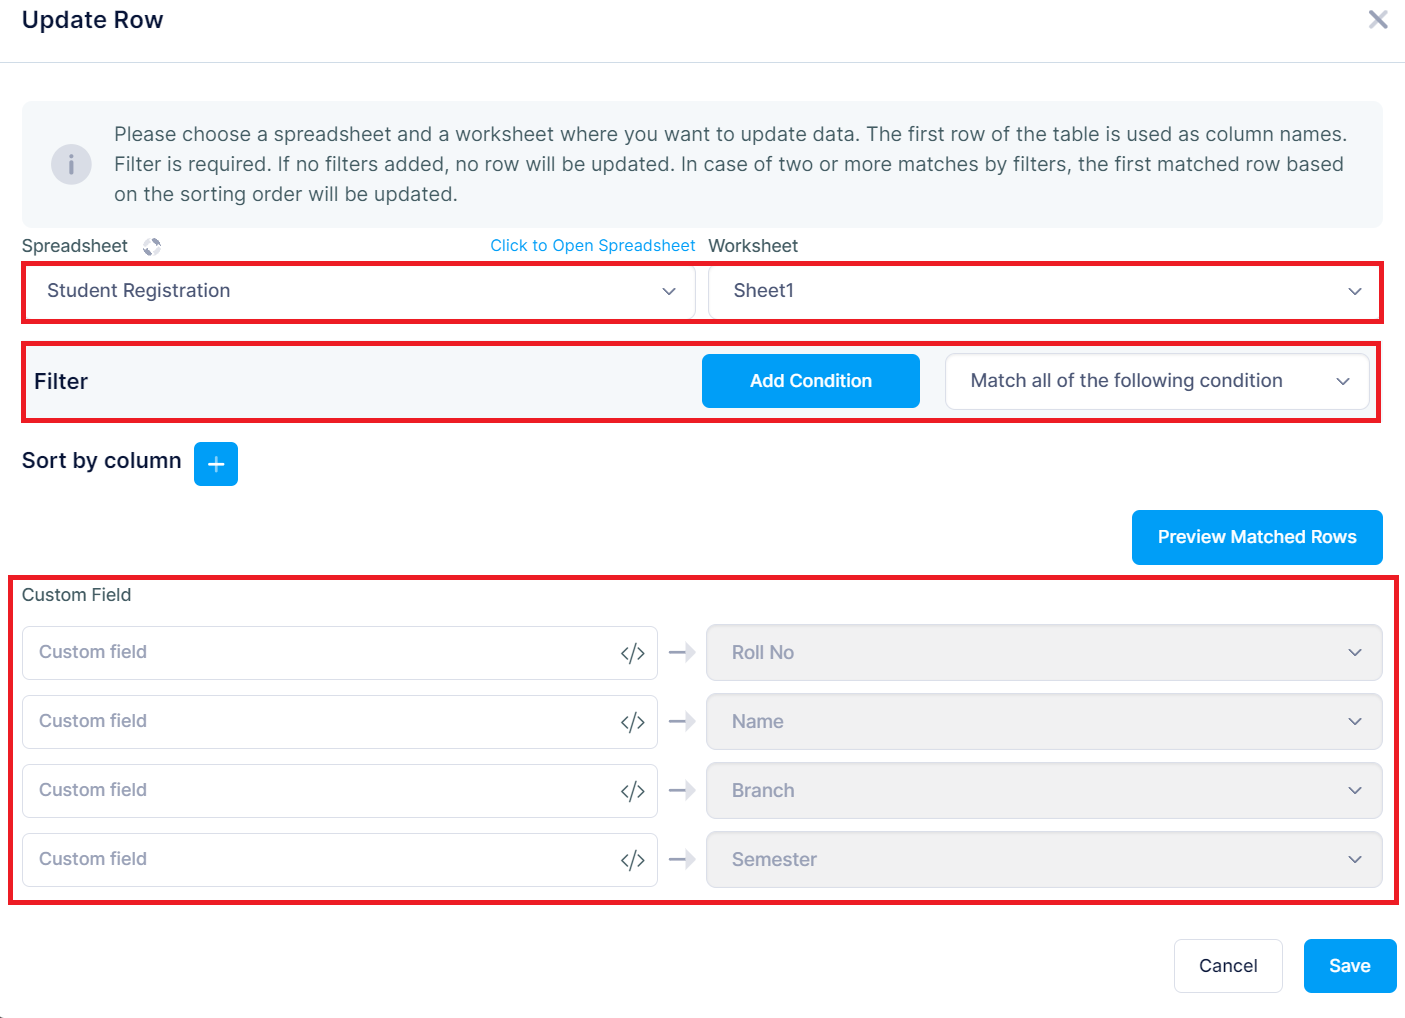
Step 3: Define Filters
- Filter Conditions: Set one or more conditions to identify the row(s) that need to be updated. You can add conditions based on the data present in any column of the worksheet. For example, setting a filter to match rows where Roll No equals a specific value.
- Sort By Column: Optionally, you can specify a column to sort the filtered results. This determines the order in which rows are updated if multiple rows match the filter conditions.
Step 4: Input New Data
- Custom Fields: Enter the new data values for the selected rows. Match these fields to the corresponding columns in the Google Sheet. This is where you define what new data will replace the existing data in the filtered rows.
Step 5: Preview and Save
- Preview Matched Rows: Before finalizing the update, you have the option to preview the rows that match your filters to ensure the correct rows are being updated.
- Save: Once you have confirmed the rows and the new data, click Save to apply the updates to the Google Sheet.
Upsert Row Feature
Overview
The Upsert Row feature combines the functionalities of updating and inserting rows into a Google Sheet via the chatbot Portal. If a specified row exists based on the provided conditions, it will be updated; if not, a new row will be inserted. This feature streamlines the process of maintaining and entering data, ensuring that the database remains current without duplicating entries.
How to Use the Upsert Row Feature
Step 1: Select the Feature
- Choose the "Upsert Row" option in the chatbot's Portal to begin the operation.
Step 2: Configure the Destination
- Spreadsheet Selection: Select the Google Sheets file you intend to modify or add data to. Choose from a list of available sheets connected to your account.
- Worksheet Selection: Specify the worksheet within the chosen spreadsheet where the data will be updated or inserted.
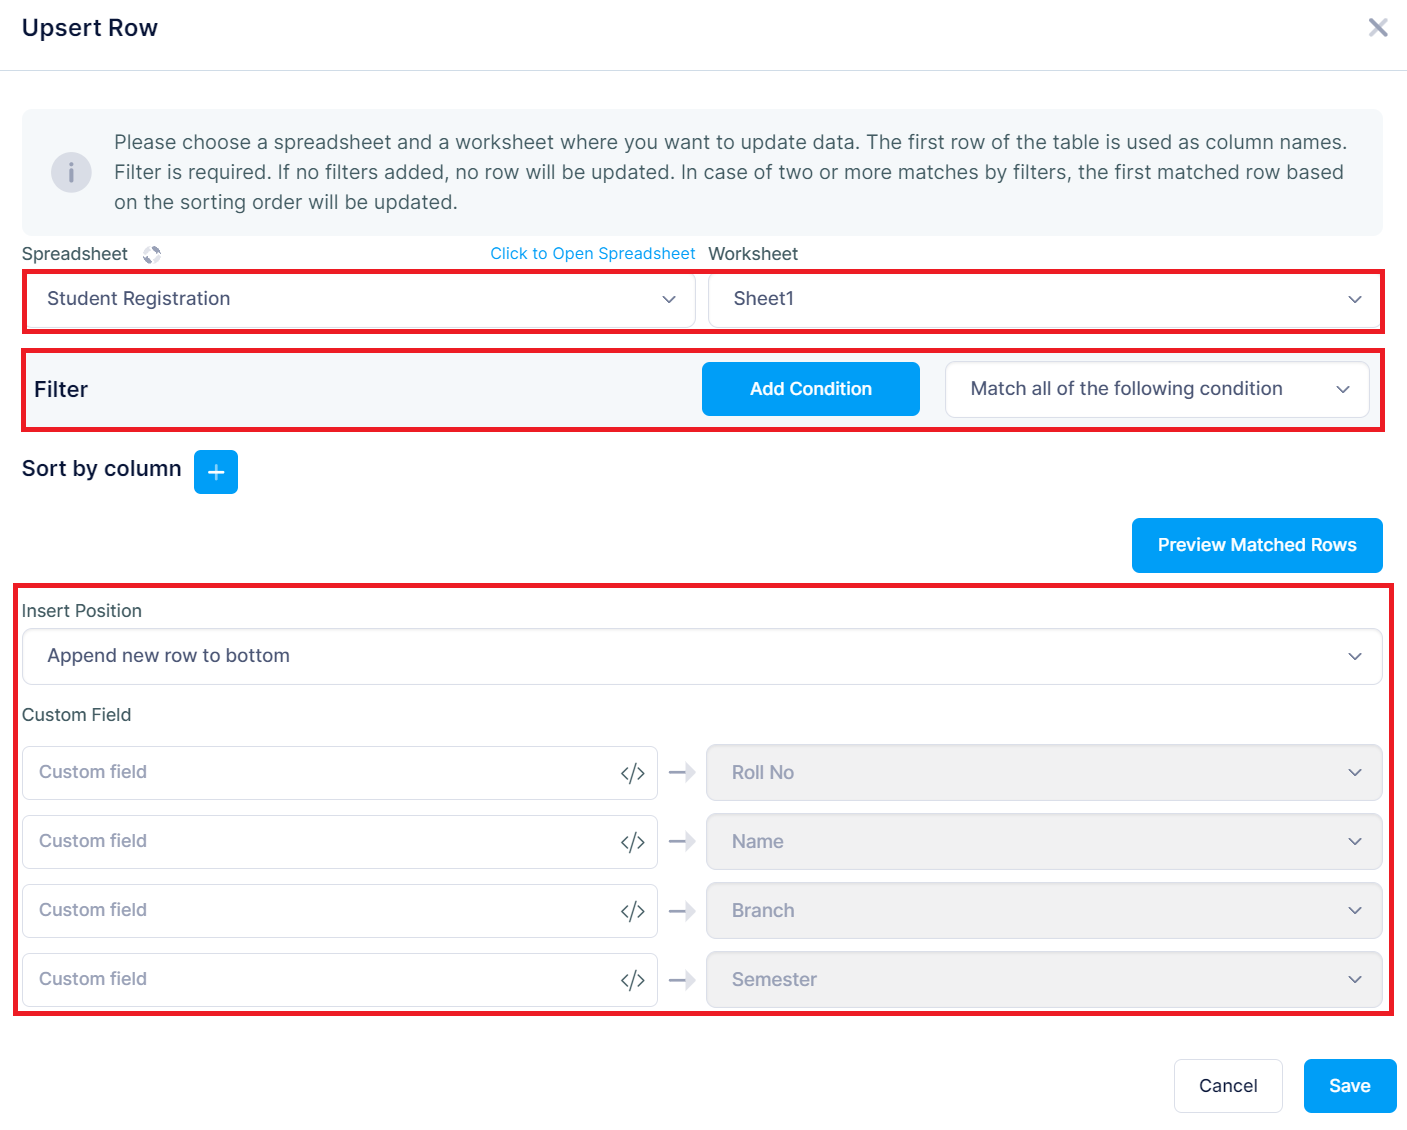
Step 3: Define Filters and Sorting
- Filter:Establish conditions to identify the row(s) to be updated. If no matching row is found, a new row will be inserted.
- Sort By Column: Optionally, you can determine the sorting order of the rows for updates. Sorting is particularly useful when multiple rows match the filter criteria, and you want to update the first matched row based on the sort order.
Step 4: Input Data
- Insert Position: Decide where to insert the new row if no existing rows match the filter criteria. The default setting is usually to append it at the bottom of the worksheet.
- Custom Fields: Enter the data for each column that will either update existing rows or constitute the new row. Match these fields with the corresponding columns in the worksheet.
Step 5: Preview and Execute
- Preview Matched Rows: Before finalizing the upsert operation, preview the matched rows to ensure the correct data is being updated or prepared for insertion.
- Save: Confirm and save your changes, which will update an existing row or insert a new one based on the conditions set.
Clear Row Feature
Overview
The Clear Row feature allows users to clear data from specific rows in a Google Sheet directly through the chatbot Portal. This feature is useful for resetting data in a row without deleting the row itself, maintaining the structure of the sheet while removing its contents.
How to Use the Clear Row Feature
Step 1: Select the Feature
- Access the Clear Row option from the chatbot Portal where you manage Google Sheets operations.
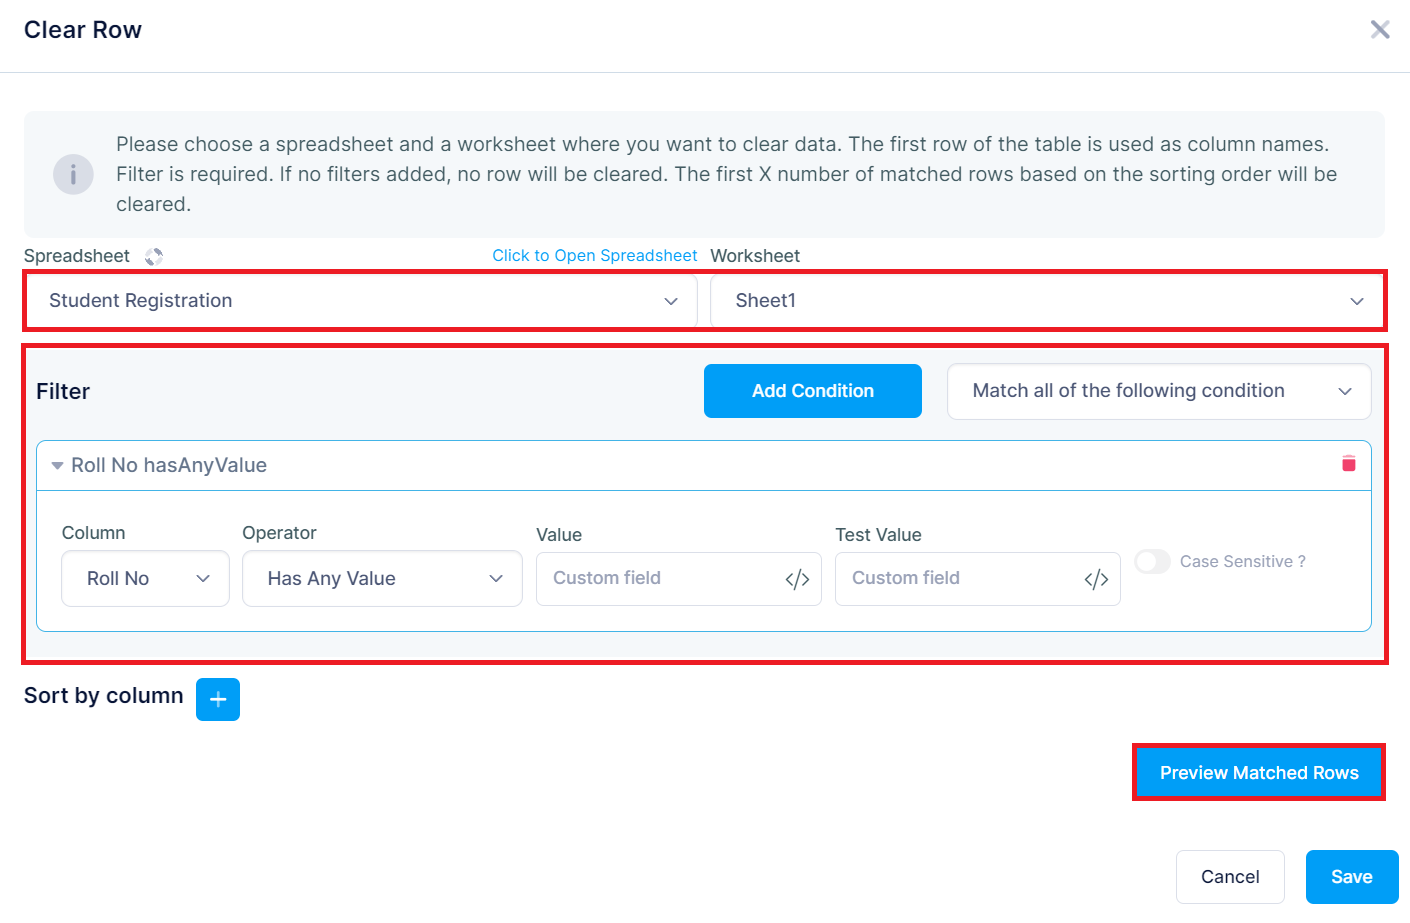
Step 2: Configure the Destination
- Spreadsheet Selection: Choose the Google Sheets file where you intend to clear data. This selection is made from a list of sheets associated with your Google account.
- Worksheet Selection: Select the worksheet from the chosen spreadsheet where the rows will be cleared.
Step 3: Define Filters
- Filter: Set conditions to determine which rows should be cleared. This involves selecting specific criteria that rows must meet to be considered for clearing, such as a matching Roll No or Name.
- Sort by Column: Optionally, you can organize the filtered results by a particular column. This is useful when multiple rows match the filter criteria and you want to specify the order in which rows are cleared.
Step 4: Preview and Clear Data
- Preview Matched Rows: Before executing the clearing operation, preview the rows that match your filter criteria to ensure the correct rows are targeted.
- Save: After confirming the rows to be cleared, click Save to clear the data from those rows in the Google Sheet.
Delete Row Feature
Overview
The Delete Row feature allows users to remove rows from a Google Sheet directly through the chatbot Portal. This capability is essential for managing data efficiently, especially when it comes to removing outdated or incorrect entries.
How to Use the Delete Row Feature
Step 1: Select the Feature
- Access the Delete Row option from the chatbot's interface where you can manage Google Sheets operations.
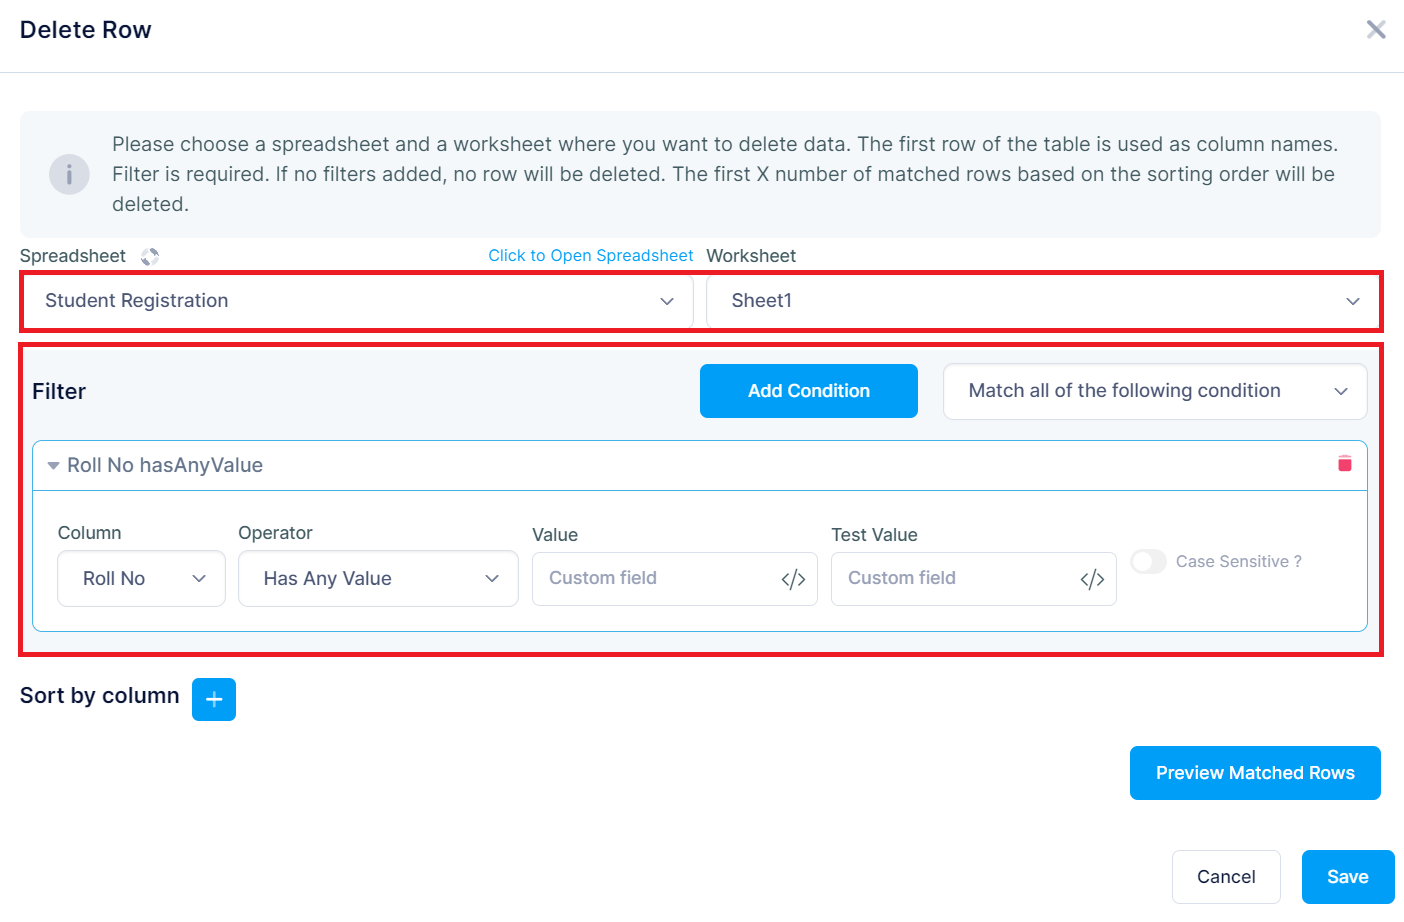
Step 2: Configure the Destination
- Spreadsheet Selection: Select the Google Sheets file from which you wish to delete data. Choose from a list of spreadsheets linked to your Google account.
- Worksheet Selection: Pick the specific worksheet within the selected spreadsheet from which rows will be deleted.
Step 3: Set Filter Conditions
- Filter: Establish one or more conditions to identify the rows that need to be deleted. You can define these conditions based on the data in any column of the worksheet. For instance, you might specify that rows where Roll No equals a certain value should be deleted.
- Sort By Column: Optionally, you can sort the results by a specific column. This determines the order of the rows for deletion if multiple rows meet the filter criteria.
Step 4: Preview and Confirm Deletion
- Preview Matched Rows: Before executing the deletion, you can preview the rows that match your filter conditions to ensure the correct data is targeted for deletion.
- Save: After verifying the rows, click Save to permanently remove the selected rows from the Google Sheet.
Get Random Row Feature
Overview
The Get Random Row feature allows users to retrieve a random row of data from a specified Google Sheet. This feature is beneficial for applications requiring random selection from a dataset, such as drawing a random sample or selecting a random entry for a contest.
How to Use the Get Random Row Feature
Step 1: Select the Feature
- Access the Get Random Row option from the chatbot's Portal where you can interact with Google Sheets operations.

Step 2: Configure the Destination
- Spreadsheet Selection: Choose the Google Sheets file from which you wish to retrieve a random row. Select from a list of available sheets linked to your Google account.
- Worksheet Selection: Select the worksheet within the spreadsheet from which the data will be retrieved.
Step 3: Apply Filters (Optional)
- Filter: If desired, you can apply filters to narrow down the pool of data from which the random row will be selected. This is done by setting conditions based on data within any column of the worksheet.
- Add Condition: Click on "Add Condition" to specify the criteria for filtering data. For example, you might only want to select random rows where the Branch is a specific value.
Step 4: Preview and Retrieve Data
- Preview Matched Rows: Before completing the operation, you have the option to preview the rows that match your specified conditions. This helps in verifying the pool of data from which the random selection will be made.
- Save: Click Save to execute the retrieval of a random row based on your settings and filters.